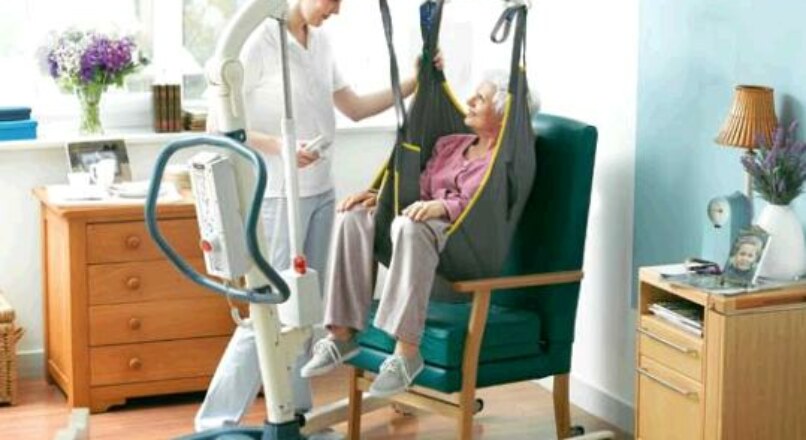
How to Use a Hoyer Lift and Hoyer Lift Slings for Dependent Patients Living at Home
A hoyer lift can be a great tool for any patient that is losing their independence, especially when it comes to being able to safely transfer at home.
Having a lift at home may allow an individual to stay in the comfort of their own home with the help of a personal caregiver, rather than having to go to an assisted living or nursing facility due to safety concerns.
Ultimately, a home hoyer lift can significantly decrease the burden of care for everyone involved while improving overall quality of life.
The Benefits of a Hoyer Lift
-
- Minimize risk of injury to both the patient and caregiver while completing daily activities related to transfers and toileting.
-
- For any patient that is extremely deconditioned, a lift will allow them more time out of bed. Getting out of bed can improve endurance, decrease risk of bed sores and improve overall mood.
-
- A hoyer lift can be operated by two caregivers, sometimes even one, once they are comfortable with the procedure.
-
-
- Most standard lifts can handle up to 400 lbs. Plus, there are bariatric options for up to 700 lbs.
-
Step One: Getting the Sling in Place
- Choose the appropriate sling. Most slings are “U” shaped, but will vary slightly in design. It is also important to make sure it fits correctly. A sling with too much wiggle room can cause slippage while one that’s too tight can cause pain and poor circulation. Make sure to consult the manual for exact guidelines on sizing.
* Fold the sling to be able to put it underneath the patient with minimal risk of skin damage. Again, your manual will show you how to fold it before use.
* Get the sling into position. For the safety of everyone involved, the sling needs to be placed in the right position. This starts with understanding how to maneuver the sling under the patient.
* When lying down: Roll the patient to one side and place the properly folded sling underneath them, making sure that it lines up correctly to minimize the need for adjustments. Then, roll them to the other side to be able to unfold the sling and get it into its correct place.
* When sitting: Have your patient lean as far forward as they can safely to get the sling behind them. Then have them lean to each side as you get the leg straps into place.
2. Safety tip*: There is debate whether it is safe to leave the sling under the patient while they are seated; this ultimately depends on their comfort and skin condition.
If you choose to leave the sling under them while sitting, make sure to check their skin for any possible sores from the position of the sling. Additionally, make sure the sling position won’t cause them to slip out of their seat and onto the floor.
Step Two: Attach the Sling to the Lift
Now that the sling is in place, it’s time to hook it to the hoyer and get moving. As you go through these steps, always explain to your patient what you are doing so there are no surprises.
- Before using the lift, make sure you’ve cleared enough space to maneuver around the room or home.* Place the lift directly over the patient and lower the fame until you can attach the sling to the lift. Pay attention as you are lowering it to prevent injury from the frame itself.
* Safely attach the loops of the sling to the lift, making sure safety clips are engaged.
* You are now ready to lift the patient, make sure the base of the lift is as wide as possible to fully support their weight and the brakes are NOT locked.
* Lift the patient high enough to clear the surface they are on.
* Move your patient to their desired location. Take your time and move slowly to prevent sudden movements that can cause anxiety.
* Make sure your patient is hovering directly over their final destination, then LOCK the lift and slowly lower them into place.
Other Practical Tips
If you haven’t used a hoyer lift before, practice using the lift with someone independent first.
* Make sure the leg loops are under the thighs and crossed to prevent slipping.
* When using a lift, still be aware of your mechanics, such as raising the bed to your height if while adjusting the sling.
* Only use the lift when the patient is comfortable to prevent injury and agitation.
* When the patient is sitting, you can keep the sling in place UNLESS they have compromised sensation that may lead to sores.
* Encourage your patient to sit up for as long as they can tolerate to promote endurance and circulation outside of lying down!
* If you are helping your patient choose a hoyer lift, keep these options in mind: weight capacity, cost, the size for maneuverability in the home, number of hooks for stability, the types of sling s it’s compatible with and whether they prefer electric or manual.
* Think about having a therapist come in to train family and friends in how to safely operate the hoyer.
* Have an emergency plan for lost power or a broken lift (see your manual for ideas).
-
-
Special Note on Toileting
-
Toileting is probably the most complicated transfer to complete with a hoyer lift since it also requires enough open space for the patient’s rear to sit properly on the toilet.
This is where a U sling is necessary so there is plenty of space. Additionally, you will have to consider how remove the patient’s bottoms. Have a procedure in mind prior to lifting patient to prevent accidents!
The Bottom Line:
Hoyer Lift’s are a Great Tool for Home Care
A hoyer lift can be a great way to encourage your patients to be up more often and decrease the need for catheters and bed pans while minimizing risk of bed sores. If this process seems overwhelming, make sure to thoroughly read through your user’s manual first.
Then, you can always start with extra help or get training from a therapist. Remember, the more you practice the more comfortable you will be!
Leave a reply